Fashion Hookup

Keeping You Up On The Latest Fashions

The Makeup Series (Part 3): No More Flaws with Concealer

March 28, 2011 By noelle


It may be because you are always in a rush and can’t be bothered to take this extra step, or it could just be because you’re not quite sure how to work with them, but you may be one of the many women who veer away from the use of concealers. Now unless you have incredibly luminous and flawless skin, you are missing out on something if you do not try adding a good concealer to your list of makeup essentials.

More often than not, we think that concealers are only useful for covering up obvious blemishes, such as pimple marks and redness. However, using a good concealer can also help hide the effects of those sleepless nights by diminishing dark circles under the eyes. This gives a fresh effect and helps avoid distracting raccoon eyes which can really take a lot away from the efforts you put into applying makeup on your face.


Just a dab goes a long way

One of the most important things to remember though, is that concealer can be your best friend or your absolute worst enemy. If applied incorrectly, it can make you look even more splotchy, which is exactly what you wanted to avoid in the first place. It is therefore important to use very little product with each application. You may want to use a concealer brush, as this picks up the right amount of product and is able to apply it precisely to the areas which need attention. An alternative, and one that I personally prefer, is the tip of your pinky finger. This is useful for blending, since your body heat helps incorporate the product more evenly.

If you are applying concealer underneath your eyes, start from the inner portion going out. Try not to use outward strokes, because it might spread the product unevenly. Instead, use a tiny amount each time and pat the area until the product has been well-blended into the skin. If you are using a cream product and intend to set it with a powder-based one, don’t wait too long, as the color may not come out very evenly.

If you are using a cream foundation, you can apply the concealer first and then layer the foundation over it. However, if you are using cake or liquid foundation, you will have to apply the concealer after. Personally, I always apply the concealer after foundation because I feel like I have more control over the evenness of the application and the final effect. I also don’t end up ponging or brushing away the concealer with my foundation.


Great concealer picks

The kind and consistency of concealer you buy will depend on your skin type as well as the kind of blemishes you intend to cover up. One of the most versatile buys is Bobbi Brown’s Creamy Concealer Kit. The product blends well and keeps the skin adequately moisturized, which helps avoid caking. It also comes with pressed powder to allow you to set the product evenly and quickly.

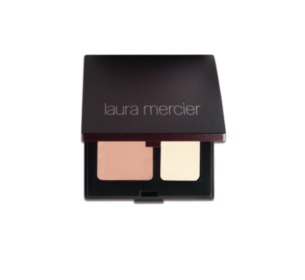
Another crowd favorite is Laura Mercier’s Secret Camouflage. It covers up minor discolorations effectively.

Perhaps the most popular of them all, Yves Saint Laurent’s Touche Éclat is not really a concealer in the conventional sense. If you use it like a regular concealer, you might not be able to take advantage of its benefits. It actually works more like a highlighter as it brightens the face and erases dark circles and shadows, making your skin look even and giving you that beautiful glow.


There are many other brands and types for you to experiment with. Don’t be afraid of using concealers, but don’t try to “conceal” your entire face with the product, either! You may find that a tiny, almost invisible dab is all that you will need to perfect your look.


Photos via bobbibrowncosmetics.com, lauramercier.com, ysl-parfums.com

Filed Under: Beauty, Makeup Tagged With: bobbi brown, concealer, laura mercier, YSL

The Makeup Series (Part 2): Setting the Stage with Foundation

March 16, 2011 By noelle

We’ve talked a bit about cleansing and priming the skin in one of our previous articles. Now comes the fun part… We’ll be talking about “actual” makeup. This starts with foundation and concealer. These two products can make or break your look. After all, you can have all the color you want, but if you don’t have flawless-looking skin, then you won’t achieve whatever effect you’re going for. In fact, you just might end up looking worse.

This is probably why I have, for years, been left stymied by these two products. I had used a lot of guesswork in the past, and my old pictures are an embarrassing testament to that. After a few years of hits and misses, I finally understood how to make these products work for me. While I can’t claim to be the authority on cosmetics, I hope these tips will help you do the same… And since the simplest things can often be the most complicated, let’s focus on foundation for now.


Liquid, cake, and other dilemmas

With countless products in the market, it can be so easy to get lost. One of the first things you have to decide on is whether to get a liquid or cake foundation. Since liquid foundation started becoming popular, I have become a convert. I love how easy it is to apply, and how I don’t have to use a sponge dipped in water when I use it, but that’s just me.

There are some guidelines you may want to be aware of before you decide for yourself. Cake foundation, for example, is supposed to give more coverage. It is also more likely to give you a matte finish for a longer period of time. This makes it a better option if you have oily skin. Of course, with new products coming out every season, exceptions have been created, and there are now liquid formulations which promise to give a matte finish that lasts.

There are also products which offer different benefits, such as added SPF. While it’s great if you can find a good product which can double as a sunscreen, it’s not really wise to depend on this alone, especially since the effects won’t necessarily last for very long, especially if you are exposed to sunlight (yes, even through your office window) or bright lights for extended periods of time. The verdict? Go for it if you want, but use a separate sunscreen with the right SPF anyway.

The same goes for products which promise to double as foundation and skin treatment. They’re great, but they’re not really substitutes for getting actual treatment for any condition you may have.

Of course, there are always exceptions. If you have a very specific condition or allergy, then you simply MUST opt for a hypoallergenic product. Your dermatologist knows best when it comes to these things.


How do you know which shade of foundation is best for you?

One of the most common mistakes that women make when choosing makeup is testing the foundation on the back of the hand or on the wrist. Ladies, foundation is quite different from perfume, so don’t even try the wrist technique! Unless the color of your skin is perfectly even all throughout your body, which is highly unlikely, this won’t work. Chances are, the color of your hand or wrist is several shades away from the actual color of your facial skin. (Here’s a quick tip: If you’re Asian, chances are, you will need a foundation with yellow undertones. Don’t worry, it won’t make your skin look sallow – instead, it will lend your skin a nice, natural-looking glow.)

Now all you have to do is take a very small amount of the product and blend it along your jaw line. The product you want is that which seems to disappear completely into your skin. Don’t choose a color that seems a bit too light, unless you’re okay with looking like a china doll, and don’t choose a darker shade, because you just might end up looking burnt. If you want a bronze effect, well, you’ve got bronzer for that.

Some people have more acidic skin than others, though. Now this is the exception, because if you’re highly acidic, there will be a tendency for the product to darken on your skin after some time. If you think you might be acidic, try the product and let it sit for a few hours. If you notice that it has turned a bit darker than your actual skin tone, then you might have to test a foundation which is a shade lighter. Again, wait and see if the color changes. This may make foundation selection seem like such a pain, but trust me, it is well worth all the effort.


Less is more

Once you’ve chosen the right product, it’s time to put it to good use! Don’t rely on your fingertips for this task. Aside from the fact that it will probably take longer for you to finish, you could mess up your clothes and end up with a less-than-polished look. Depending on the product, you can choose to use a foundation sponge or a foundation brush. Some cake foundations work better with sponges, but the creamier formulations are easily picked up by the brushes, too.

If you decide to use a sponge, choose the triangular ones over the round sponges. The corners can be very useful whenever you want to blend the color on smaller areas, or when you want to clean up smudges caused by eyeshadow or eyeliner.

I am personally a fan of brushes, and I think a good foundation brush is the ultimate must-have (okay, good eyeliner is the ultimate must-have, but you get my point). It makes makeup application more pleasurable as it glides on smoothly on your skin. Of course, the shape allows you to reach smaller spots, as well.

When you apply foundation, make sure to use just a tiny bit with each application. Don’t pile on the product immediately, or else your face is going to look cakey in the end. Just like salt, it is easier to use just a little and gradually add more than to use a lot and find it difficult to reverse the damage. Apply the product using downward strokes, following the direction of facial hair growth (yes, you do have facial hair!) to allow the product to glide seamlessly on your skin. If you’re new to makeup, this may seem tedious, but with a bit of practice, you should feel more comfortable with it quite quickly.


A few of our top picks

Since there are so many products out there, it is impossible to come up with a definitive list of the best products. To help you get a headstart, here are some which have been tried, tested, and loved!

Who says liquid foundation is not for those with oily skin? Nars’ Sheer Matte Foundation is specially-made for those with normal to oily skin, and has been formulated to fight shine all day. This is a great product to use on a daily basis as it keeps the skin looking bright and fresh.


On the other hand, those with dry skin can take comfort in the fact that something has been created especially for them. One of the best brands ever when it comes to foundation, Bobbi Brown, has come up with the Moisturizing Cream Compact Foundation. Aside from providing full coverage, it also contains oils from jojoba and avocado which nourish the skin all day long. It’s a great choice for young ladies who have naturally dry skin or who live in very dry weather conditions. It’s also excellent for middle-aged or older women who are starting to see some wrinkling.


The last one on our list, Shu Uemura’s Face Architect Smoothing Fluid Foundation, helps you achieve the right balance because it provides a matte effect while keeping the skin hydrated. This product is so light, which makes it great for those who don’t want to feel like they’re wearing makeup.


So that’s my take on foundation. Do YOU have any favorites?


Photos via narscosmetics.com, bobbibrowncosmetics.com, and shuuemura.co.uk


Filed Under: Beauty, Makeup Tagged With: foundation, makeup

The Makeup Series (Part 1): Preparing Your Face

March 9, 2011 By noelle

While putting on makeup may seem simple enough, it is not surprising to see that a lot of us ladies really don’t have much of an idea of what we’re doing, which products to use, or how to use these correctly. After all, there are countless products in the market for all sorts of skin types and designed to produce different effects. It’s easy to feel overwhelmed in the midst of all those pots and jars. Wait ‘til you start reading the labels and sorting through all of the colors!

On the other hand, there are those who think that makeup application is as simple as slathering some product on without much thought. They often end up either messing up their look or failing to take advantage of what they already have. How many times have you seen someone with a sloppily made up face? It’s hardly flattering, and it defeats the purpose of highlighting one’s best features.

This is why, no matter what your difficulty with makeup is, it is very helpful to be familiar with the different products available. This can help you choose the right ones for you, which means you don’t waste money on things you can’t use. You will also be able to make the most out of your makeup if you know how to use it, because you’ll be able to actually get it to do what you had originally intended.


Step 1: Cleansing

Before anything else, though, let’s talk about preparing your face. A beautiful painting must start with a clean canvas, and that’s exactly what your face should be. There are a lot of cleansers out there which you can use, but make sure that you choose one which won’t irritate your skin.

On days when you have a lot of dead skin or some stray flakes on your face, you might want to use a gentle face scrub to get these out of the way, especially since makeup makes these much more obvious.

St. Ives Apricot Scrub is one of the most popular scrubs in the market, and for good reason. The apricot stone grains gently exfoliate and brighten the skin instantly. Of course, it doesn’t hurt that the product smells good, too.


Another very popular cleansing product, especially for those with sensitive skin, is Cetaphil. The formula has emollient qualities that soothe irritated skin while cleansing it at the same time. The product is known to be so mild that it is recommended even for babies!

My personal favorite is the cleansing oil created by Shu Uemura. They may be called cleansing oils, but they don’t leave the skin oily at all! In addition, they come in different varieties, so you can choose which one best suits your skin type. The “fresh” variant, which comes in a light pink color, is the one I use most often. It leaves the skin feeling so clean and soft, it’s no wonder that the cleansing oil range is the most popular line they have.


Step 2: Priming

After cleansing, the next step is to apply some makeup primer. While a lot of people skip this step, it is not a useless one. Using primer already has the effect of concealing some discolorations. It also provides just the right amount of moisture and smoothness to allow the foundation to glide on smoothly. With the right primer, one can expect the makeup to sit on the skin much better than it would without it.

Choosing a primer should be a lot easier than finding the right foundation, so don’t stress out! Makeup Forever, for instance, has an HD primer which does not only smoothen the surface of the skin, but also helps the skin tone appear more even. The great thing about this is that it comes in several variants. You are bound to find something that works perfectly, no matter what your skin type is. A sponge may be used to apply this product. However, for greater control, it is also all right to use your fingertips to blend the product in.

Shu Uemura has also come out with an easy-to-use makeup primer. The best thing about this product is that it comes in mousse form, making application oh-so-easy and allowing the skin to feel light and smooth. It can easily be applied with a sponge. Since it only comes in two variants – pink and beige – it is not really hard to make a selection, either.


There are a lot of other cleansers and primers out there. Feel free to look around for one which suits you best. Of course, it won’t hurt to try looking for hypoallergenic ones. Also, try to consider your skin type. If you already have dry skin, don’t go for cleansers that are too strong or abrasive. Of course if you have oily or combination skin, it makes sense to steer clear of products which are oil-based or which seem to have a very heavy formulation. If you have a particular skin condition such as rosacea or if you have had a history of skin allergy, you will have to be even more particular with the products that you use. When in doubt, consult your dermatologist.

Once you’ve found your cleanser and primer, things will start to get a bit more interesting. It’s time for “real makeup.” Let the creative process begin!


Photos via stivesbeauty.co.uk, cetaphil.com, shuuemura.co.uk, and makeupforever.com

Filed Under: Beauty, Makeup Tagged With: skin, skincare

The Essential Nail Color Palette for Spring

February 9, 2011 By noelle

While it may still be chilly where you live, there’s no doubt that Spring will be here before we know it. That means only one thing: It’s time to gear up for a change of wardrobe and of course, nail color!

Fall and Winter saw us painting on some pretty luxurious shades of caramel and darker jewels. These were excellent for driving away the cold and getting us to feel all warm and festive for the holidays. For Spring, however, these may be just a tad too overwhelming. For a brighter and lighter feel, you might want to think of transitioning from the darker, richer shades to those which resemble candied almonds and Easter eggs. It’s time for a change!

In Full Bloom

Spring is all about color bursting forth from the earth. Get into a brighter and more cheerful mood by painting on some sweet pastels and bright pinks. If you can pull it off, you might even want to combine colors or use different shades for a bit of nail art!

Remember how we told you all about the Color of the Year for 2011? Well, this season, you can certainly be in fashion by picking out a honeysuckle polish. OPI’s Flower to Flower comes very close to this year’s most happening hue.

For something a bit more subdued, Orly’s Chantilly Peach makes a great substitute. It gives just the right sort of gloss with a bit of sweetness. It’s a really good option for those who want to wear a bright color without being too loud.

On the other hand, Essie’s French Affair, which is a mix between lavender and pink, adds just a bit of mystery without losing the playful vibe of the season.

For a refreshing, citrusy boost of color, there’s Lemon Fizz by China Glaze. What’s great about this color is that it suits a lot of skin tones, because it’s bright enough to look alive, but the shade isn’t too dark so as to make it look gaudy. If you want to channel the energy of the first bit of Spring sunshine, this is a great color for you.

Chilling Out

If pink is not your thing, but you still want to go for something light and playful enough for the season, why not go for blues and greens in their more pastel hues? For instance, OPI’s Breathe Life is a silvery-blue polish. It’s a great color to wear if you’re going for a light, airy vibe.

Another cool shade to wear is mint green. Re-fresh Mint by China Glaze is definitely the way to go for those who like this color. It’s the best shade for those who’d like to welcome the green of Spring without succumbing to a grass-stained look.

Sophisticated Classics

Of course, there are just some colors that never go out of fashion, regardless of the season. Even as you go out and get those pretty pastels, make sure you still have a couple of bottles of the indispensables. Nudes and reds just look beautiful and classy, period. If you want a relatively neutral color that still suits your Spring mood, check out Essie’s Sand Tropez.

To distinguish from the deeper, more jewel-toned reds that were all the hit during Fall, try to go for a brighter shade of red with the tiniest hint of orange. Orly’s Haute Red might do just the trick.

Changing your nail color is one of the easiest, most effective ways to change your look and mood. In the coming season, make sure you don’t miss out on the opportunity to liven up your appearance by experimenting with some new colors. More importantly, don’t forget to have fun and flash those new nails with confidence!

Photos via orlybeauty.com, nailtechsupply.com, naildepot.ca, harpersbazaar.com, and essie.com

Filed Under: Beauty, Trends Tagged With: nail polish, Spring 2011

Winter Beauty Tips

February 2, 2011 By Fashion Bug

Lotion_Bottle_Shampoo_Bottle_Shower_Bottle_Body_Lotion_Moisturizer_Day_Cream_Case_Night_Cream_Jar_body_wash_It’s STILL winter and don’t we all know it! I know most of you are probably yearning for some place sunny and warm, but hey, if you can’t do anything about it, so be it. Did you know, though, that your beauty routine should be adjusted to the winter weather? Here are some tips that can help you look fantastic despite the cold.

Don’t go easy on lotions and creams. The winter months are bad for the skin in that the cold dries it up even more. As such, don’t hesitate to use more lotion or facial cream than you normally would. Moisturize, moisturize, and moisturize some more.

Don’t forget your sunblock. But it’s winter, right? Yeah, but that doesn’t mean that the sun is not emitting UV rays – that’s something that doesn’t disappear. So when you’re going outside, don’t forget to put on some protection.

Don’t forget your lips. Your lips are probably chapped because of the cold. I know mine are – that is if I don’t use lip moisturizer or balm regularly. In case your lips do get chapped, use an exfoliant to get rid of the chap. You can make one at home using brown sugar and olive oil (or honey if you wish).

Don’t give up on a glowing look. It’s winter and you think you look like a pale fish. You just might be right but that doesn’t mean that you have to go on looking like one. Put foundation on. Better yet, mix some highlighter in with your liquid foundation – you’ll see a world of difference!

Filed Under: Beauty Tagged With: beauty tips, products, winter

  • « Previous Page
  • 1
  • 2
  • 3
  • 4
  • 5
  • 6
  • Next Page »

Categories

Copyright © 2023 FashionHookup